Monday, July 9, 2012

Craft Table Update

Remember this ol thang?  It has been an eye sore for too long.    I originally painted it a light gray, but it looked too blue in the room, so I decided to paint it white.  A piece of this size and with so many shelves seriously blows for lack of better words to paint once, let alone twice!  That is why I left it looking like this.


I finally decided to paint it this weekend.  

And I am so glad I did.  It looks so much better.


I am glad that is done.  Next time I will be 100% on my color choice with something so big.  I am on the look out for a big old chunky china cabinet to put into this room for more storage.  If anyone has one.. send it my way!

Sunday, July 8, 2012

Pleated Dress from Men's Polo


Today I grabbed this "salmon" colored shirt out of Drew's closet.  He hasn't worn it in a year.  It was from Old Navy.  God knows those shirts are on sale for $10 for a reason.  Anyway it was shrunk and wonky so i thought I would make something out of it.  We need to clean out our closets anyway.  (more me than him but whatever)


If you want to make your own, here is the tutorial:


I cut out the dress pieces as shown.

You will need a skirt, front and back bodice pieces, two sleeves, a color and the two neck bindings.

Take the neck bindings and fold in one long and one short end and iron.
One neck binding should be slightly longer than the other


Take the front bodice piece and cut a 3-4 inch slit in the middle. Put the right side of the neck binding down on the backside of the front bodice piece.
Line up the raw edge of the neckline and the neck binding and the center slit with the other raw edge of the binding (as shown).  Stich the binding to the slit

Do the same with the other side.  You can see that the right side is longer.  

Pull the binding to the front side and fold it down (similar to double fold bias tape) Then top stitch the long side down.
It should now look like this and the long binding should be on top of  the short one.


Right sides together, sew the side and shoulder seams.

Sew both sleeves together on the side seams.

Right sides together, sew the sleeves in matching the under arm seams.

Pleat the skirt until it is the same size as the opening of the bodice.
Stitch a basting stitch through the pleats to keep them in place for the next step.

Turn the skirt inside out and slip it over the bodice, right sides together. 
Align the raw edges and sew the skirt to the bodice.

I cut the collar in half lengthwise and pinned it to the neck line.  
I put a few pleats in the collar to fit it.


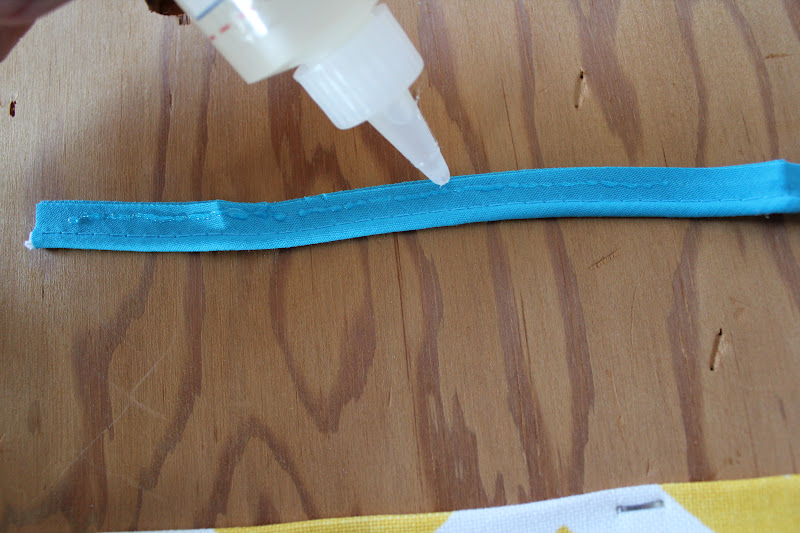
Because of the raw seams I folded the end of twill tape and then stitched in along the neckline on the inside of the collar.


Little Alaire wouldn't put it on for a picture because.  "Mommy don't take that dress off of my girl.  That's her dress"  She is very protective of this headless mannequin.  She dances with it and it cracks me up everytime.  

Friday, July 6, 2012

Quick Chair Recovering

This is a super fast and easy way to recover a dining room chair.  In other words, there are better, more professional ways to do this : )

I found this chair at a thrift store for $20, but all furniture was half off that day, so it ended up being $10.  I didn't know where I was going to put it but I liked the detailing and it wasn't wobbly or badly beaten up.

The seat, however, was disgusting.


I decided I was going to put the chair in the craft room, and maybe end up using it for an extra in the dining room.  Our dining room is actually a yellow color currently, so it would match well enough. (I don't know how long it will stay that color though.. ha!  Re thinking a lot of my paint choices this year!)
Moving on!  I already had bought four different fabrics to use for different projects in my craft room.  I ended up picking a chevron print to use on the chair.

To recover most dining room chairs, you literally flip it over and unscrew four screws.  Then you end up with this:
I told you it was UGLY.

I cut off the material from the underside of the cushion.

It had piping and a zillion staples.

I tried this...

This worked better.
After I got most of the staples off, I found this.  Gross padding.

I didn't want to go out and get new foam and the chair was comfortable as is, so I decided to take off the piping and leave the other material.  Since the pattern wasn't printed I just put material right over it.


Cut a square bigger than  the cushion.


I folded the raw edge under and then pulled it taught.

I stapled that side down.

Use a lot of staples (I know this because the original was stapled to death)
Do the same thing to the top and make sure you pull it really tight before stapling.

Staple each of the sides the same.

This is the front side.

I decided to add piping.  I used pre-made piping and glued it with fabri-tac.

Glue and pin to hold it in place


Boom done.  Trace the cushion onto a piece of material and glue or staple it down to cover the messy underside (not pictured)


That's it.  This project took about an hour, so not too bad.