Thursday, November 15, 2012

Tassel Garland and Tutorial


I love versatile decor that can float through the holidays.  I am one of those people who suck at taking things down.  I made this in October and it is up for November and I will probably leave it up for Christmas because I have white and teal decor for my tree.  


To make:
1/4 yard  of 4-5 different fabrics  (I used 4 colors of the cheapest quilting cotton and silver lame fabric)
8 feet of twine
string or sewing machine
scissors or a rotary cutter


I left the fabric folded in half as it came off of the bolt.  Cut through the fold.  That will give you two rectangles of each color.  Each Strip should be 9 inches wide, which is 1/4 yard.  It doesn't matter if they are a little bigger or smaller.


This is a 4 blade rotary cutter, which I got at Hancock Fabric.  It is for those fleece tie blankets, but works perfect for this.


Fold the fabric in half.  You can use a scissor too, no need to be perfect.  Just cut 1-1/2 inch strips all the way across the fabric.  Leave 2 inches uncut on the folded edge.


They should now look like this:


Roll them up


Pinch the top and twist it into a loop.


I sewed mine across, but you can also tie them off with string.  The loop just needs to be big enough to fit a piece of twine through.


Here is the rope I used.  It is what I had on hand.  Jute is a little less rough and it works well too.  Just string them all on a length of the rope and you are DONE!


If you are wondering how I got it to stay in my mantel.


I hope you are all having a good week.  Were getting ready for Thanksgiving and visiting our families. It should be a fun trip!

Wednesday, November 7, 2012

Alaire's Room: Lamp and Tutorial

I made Alaire this lamp for her room.  It was pretty easy.  


I bought Alaire this lamp at Target.  At around $14 it was the perfect price!
Room Essentials® Stick Lamp with White Shade


Here are the supplies I used: 

Spray glue
hot glue or fabric glue
sissors
fabric
bias tape (optional)


First wrap the fabric around the lamp shade to mark it to cut.

Cut down the fabric. Leave extra fabric on the top and bottom and enough to overlap around the shade.


This lamp shade doesn't come off easily so I had to cover it while still on the lamp.  If it would remove easily I would have taken it off.

Iron the top of the fabric 1/2 inch and then another 1/2 inch so that you cannot see the raw edges.

 I used Wonder Clips but you can use any clips even hair clips or paper clips to hold the fabric.

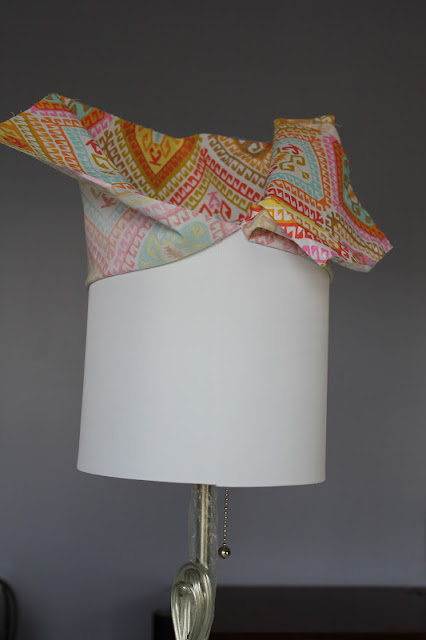
Clip the top edge over the top of the shade.
Lift up the fabric and then spray the whole lamp shade with spray glue.

Pull the material down starting on one end of the fabric.  Make sure it is tight and wrinkle free.

Next fold the open end under to create a seam.

 Spray glue the remaining flap and smooth it over.


Work your way around the top and tack down the top edge with fabric glue or hot glue.

I clipped it because I am impatient.


I cut off the bottom edge almost all the way up to the shade.  If you aren't going to use bias tape around the bottom, then you should fold the bottom edge under and glue it down too.  Then you would be done.

If not starting at the back seam, open your bias tape and add glue.


Boom done.

I love a quick project and I love this fabric!!!
It's Michael Miller Spa Geo in Coral.

I have done a few other updates/ projects in her room.  I'll have to take some photos soon.

Tuesday, November 6, 2012

Loft / Playroom

There has been much progress in the loft.  Here is my first post about the loft/playroom.  I still have a lot to do, but it has come along way.  

Remember this?
 This was the day we moved in.


This was after we painted and then literally dropped every single toy on the floor in the room.  At least the carpet was new and clean at that point. 


I have built a couple of things for this room.  I still have a few more things to make, but this is what I have done so far.

Miss Alaire wouldn't get out of the shots nor would she put clothes on.  Sorry, that's her most recent thing.  "Mom i just want to be naked"  Sweet!  Enjoy it while you have the body to do it without offending anyone! Ha!

Here is the view as you walk up the stairs.  This side of the room is all of her pretend play stuff.  She is so into dolls and make believe so I wanted her to have an area dedicated to playing "house".


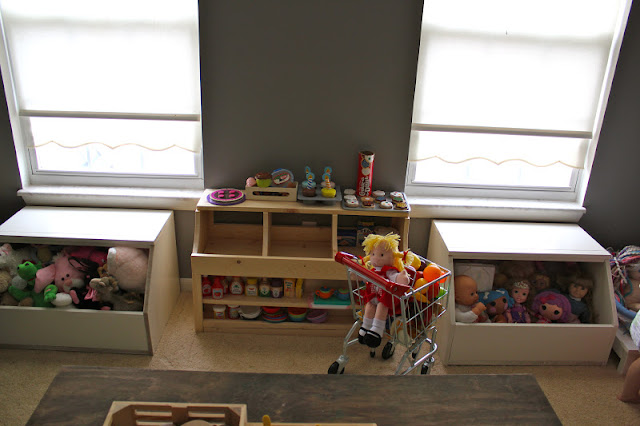
I built the two outside bins to go on the wall with the TV.  I am a big dumb animal and somehow ended up not measuring correctly before building.  I made the furniture about 2 inches too wide to fit the tv on the wall.  That was a fun day when I figured that out! : )

Anyway one holds all of the dolls and one holds all of the stuffed animals.  These open bin storage pieces are perfect for young kids.  Alaire can pick up her own toys and put them away.  

The piece in the middle just got finished on Saturday.  I didn't get it painted yet, but Alaire wanted to play with it right away.  It is for all of her play food and dishes.  It is a little grocery store/ market.  We had a major problem with  play food storage.  It was all in a bucket and what happens to buckets of small objects?  They get dumped out : )  She loves it and we played with it all day.  My mom and dad bought her a grocery cart last winter and it is so perfect with her new market!


You can't play house without a place to cook.  She has had this kitchen set for two years and plays with it more  and more.

We moved her dining room table up here so she can play puzzles and games on it.  She loves to "feed" her dolls at it too.


 Here is another area that is evolving. 

Here is the other side of the room:

I built the two towers on each side of the TV.  I have plans to build a TV stand and additional shelving too.  The open bins, which hold the dolls and stuffed animals, were supposed to go one on each side of the towers.  We plan to get a bigger TV at some point to so I have to leave enough room for that in the middle.  We had to have some seating for the TV, so we kept the black fold out couch and the yellow chair.

Here is a close up of the towers.  I still have to put the trim on them after the whole wall is finished.  That is why the edges are unpainted and raw looking.


And the last wall is full of books.   


It has definitely come a long way.  I love that it is clean and organized even while I am still working on it.  When it is closer to completion I will have to go more in to detail on what I did to get it from start to finish.  It definitely takes a while to get all of it right and functional for both myself and for Alaire.

Things I still need to do:


  • Make curtains and take down the pull shades
  • Put up crown moulding
  • Take down track lights
  • Replace Ceiling Fan
  • Sell Mickey Lamp on Craigs List
  • Build TV stand and other shelves for TV wall
  • Touch up paint and put trim and moulding on all of the shelves
  • Artwork on walls
  • Fix oven door on kitchen set
  • anchor refrigerator to wall
  • make cushions for open storage under windows
  • get or build chairs/ benches for table
  • paint and finish market
Just a few things right? haha

I hope everyone is having a good week.  I am already trying to get prepared for the month of December.  We have Christmas and Alaire's birthday here at home, but we travel for Thanksgiving.  So, I try to get as much done before we leave because I HATE coming home to a crazy list.  I like to enjoy all of the fun in December!  (well that's what I like to hope for every year anyway!)


Monday, November 5, 2012

Bare Bones

Disclaimer:  The salon is in, but it isn't even close to being finished.  It is bare bones.  There is nothing hanging on the walls.  There are more projects ahead of me than behind me.  

My goal was to have it functioning, and it is.  So, that is success for right now.


This is the view from the door.  Right now this chair is there.  I have two cane back chairs to recover to put in this space but they are fugly right now.  

Here they are.  Wasn't exaggerating


Obviously they are getting recovered, but I am horrible about narrowing down fabric choices.
I wanted to add teal and a red/orange to the room, so hopefully I can find something along those lines.

I wanted a bold wall without bold color.  This is what I decided on.
Gray on gray stripes.  Or is it grey on grey?  
I opted for a "wet station"  It takes up minimal space and requires a lot less furniture.  I am not a huge fan of laminate salon furniture so I opted for just the basics.  The teal metal locker is a thrift store find that I painted. Its perfect to hold all of my towels and capes and shampoo.
I absolutely love the chair, although I wish I was sitting in it more : )  
Maybe Alaire can be taught shampooing.
One project that needs to be addressed immediately is this light.  It's terrible.  TERRIBLE.  It's on the top of my list.
Good thing I get really great natural light and a decent view.

So there are the current "After" photos.
These are the before pictures if you were didn't see them.

To be continued..... someday : )