 |
| Source |
or this
 |
| Source |
or this
 |
| Source |
If you object to wanting one of these rooms, go ahead and click that red X in the top corner of this page. How can anyone not want something so clean organized and damn good to look at?
The truth is, we all want these, but not everyone can justify the $1500 dollar price tag on the storage wall alone, minus all of the bins and containers.
Someday I would love a whole room like one of those, but for now I just want a great table for Alaire.
We have a bar height kitchen table, which we like, but for kids coloring and painting, it isn't great.
Every time something drops, and believe me you something always drops, I have to pick it up. Or, Alaire gets down and brings paint and markers and glue and paper scraps with her.
My solution was to build her a table to do arts and crafts on, but something she can eat at for snacks and lunch and when we have friends over. Something that is short enough that she can stand at or sit at and get up and down easily.
I told Alaire that I was going to build her a little table to do her crafts at, and she got excited. She told me "mama you make you big table and you make me a little table. You sit at you big table and sew dresses. I sit at my little table. Gimme my sewer machine back mama. Go to the garage and get you hammer." I guess that is what happens when your child knows that you can build things.
Originally I thought about building Ana White's Clara Table. It is super cute and simple and you can paint or stain it to your preference. But, then I decided I wanted something pretty and more curvy and something that didn't look like a little kids table. I wanted something that would fit in with our home and would look good sitting int the middle of our kitchen or living room. I also wanted something bigger that looked more like a dining table but for little ones.
I love Pottery Barn's tables, but their straight legged table that is similar (but smaller) in size is right under $500. Surprisingly that is with chairs, but ehh no thanks.
Here is what I came up with:
Alaire loves it!!! So do I!!!
If you are interested in the build, it was super simple!
I bought four unfinished pine table legs at Lowes for around ten dollars each. (this was the most expensive part of the table)
Wood Supply Lists
4 unfinished pine legs @ 21.25" or 1-2x2 @8ft
3- 1x3 @8ft
1 sheet of 3/4" smooth plywood or 1 sheet of 1/2 inch smooth plywood
optional: trim for table top edging
CUT LIST
2-1x3 @41"
2-1x3@ 23"
plywood 30x48
***if you are using 2x2's for legs you will need to cut 4 at 21.25"
(you will need to cut the support boards out of the 1/3's as well)
I used a Kreg Jig (which is AMAZING BTW) to join the aprons to the legs.
Measure the distance between the long aprons and cut three support bars. Two would probably be enough but I KNOW kids will be sitting and standing on this thing, so better safe than sorry.
Drill out holes with the Kreg Jig in the support bars to attach them to the aprons and to attach them to the table top.
The Lowes I went to didn't stock 3/4" smooth stainable plywood. They only had 1/2". Because I am the type that must get this table built right NOW, I bought a sheet of the 1/2" and had them cut it at the store into 2 pieces measuring 30x48. I used wood glue and clamped the two pieces together, as pictured above. I put weights on it to make sure the whole sheet was clamped down.
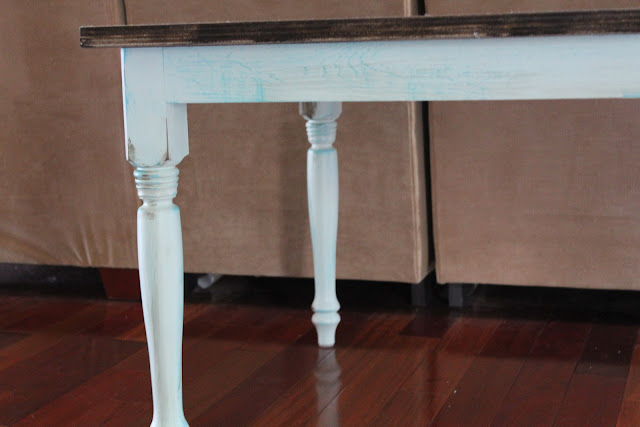
I painted the base. I used the color Pillow Mint by Valspar for the base color. I dry brushed on Aqua Ocean and then I sanded the edges and used Dark Walnut Minwax Wood Finish to stain the sanded areas.
I stained the top the next day after the glue had dried. I used the Dark Walnut Minwax for the table top as well. I haven't done it yet, but I will put a few clear coats on the whole thing to protect it from this girl:
 |
| It never fails. She finds these flags everywhere we go, especially Lowes. |
ANNND back to the table.
After the table top and the base are dry, drill the base into the table top and flip that thing over and enjoy! I put floor protectors on the legs to keep it from scratching my wood floors up. Alaire flipped when she saw it. I love bringing things like this into the house when she is outside and then seeing the look on her face when she discovers it.
Here is one more look at the final product.
I still have to put the trim and the clear coat on it. I also have to get some seating for it. I have a few cute ideas for that!


ok.. you've convinced me what Ana White has been trying to for years... i NEED a Kreg Jig!!!! it's beautiful!
ReplyDeleteGreat job. We need to get a little table, but I love the idea of making one. It looks so easy too!
ReplyDeleteI LOVE THIS TABLE!!! You did a fabulous job!!!! I want it!
ReplyDeleteI REALLY hope you are planning on sharing this over at The DIY Dreamer... From Dream To Reality!! :)